A common method for “crashing the schedule” is to ask a resource to work overtime to “make up” for project slippage. Did you know that Microsoft allows you to plan and track overtime work that is costed at a higher cost rate than standard work? And did you know that planning and tracking overtime work is not as easy as simply typing “10 hours/day” of Actual Work for the resource assigned to the task?
If you want to plan and track overtime work in a project, there is a specific process you will need to follow to do this correctly. I thoroughly document each step in this blog post.
The first step in the overtime tracking process is to make sure that you have entered a Standard Rate value and an Overtime Rate value for each of the resources on your project team. For example, Figure 1 shows the Resource Sheet view for a project in which I have entered “$50/hour” in the Standard Rate column and “$75/hour” in the Overtime Rate column for each of my project resources.
 Figure 1: Standard and Overtime Rates specified
Note: If your organization is using the Microsoft PPM solution (Project Server or Project Online), your application administrator would need to enter a Standard Rate value and Overtime Rate value for each resource in your Enterprise Resource Pool.
The second step in the overtime tracking process is to make sure that you have at least one resource assigned to every detailed task in the project. If you need to plan for overtime work before the project goes live, you can do this as part of the resource assignment process; however, we usually plan overtime work in response to schedule slippage to “catch up” a slipping project.
Figure 2 shows the Tracking Gantt view for a slipping project. The Design task is completed, but the task took 3 days longer to complete than originally planned, as indicated by the “3d” value in the Finish Variance column. Because the Design task was a Critical task, the project will now finish 3 days late unless we intercede and revise the remaining schedule. One of the ways we can revise the schedule is to assign overtime work on one or more of the tasks.
Regardless of when you need to plan for overtime work on a task, the third step in the overtime tracking process is to assign overtime work to one or more resources. Here is how to do it:
 Figure 3: Right-click in the Gantt Chart pane
Completing the preceding step will display a combination view (“split view”) with the Gantt-based view in the top pane and the Task Form view in the bottom pane, as shown in Figure 4.
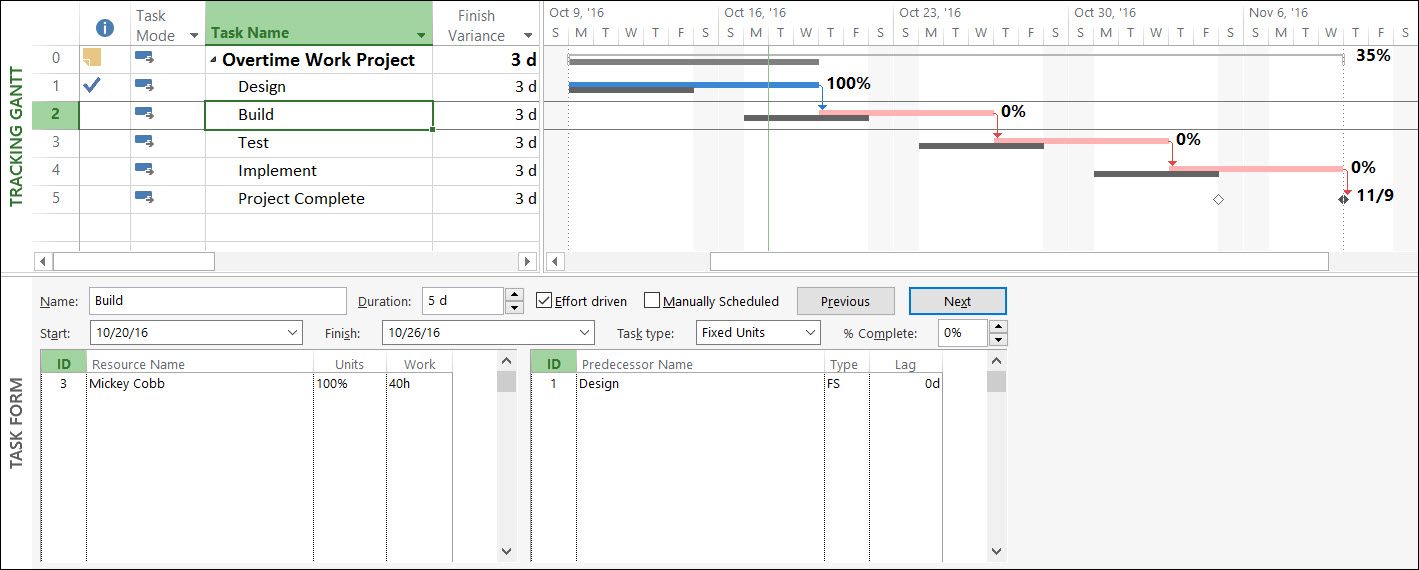 Figure 4: Combination view applied
4. Right-click anywhere in the gray part of the Task Form pane and select the Work details on the shortcut menu, as shown in Figure 5.
 Figure 5: Display the Work details in the Task Form pane
Completing the preceding step will display a set of work-related columns in the Task Form view, such as the Work and Overtime Work columns. Notice in Figure 6 that Mickey Cobb is currently assigned to the Build task with 40 hours of work. All the work currently assigned to her is categorized as regular work (non-overtime work), and is costed at her Standard Rate of $50/hour.
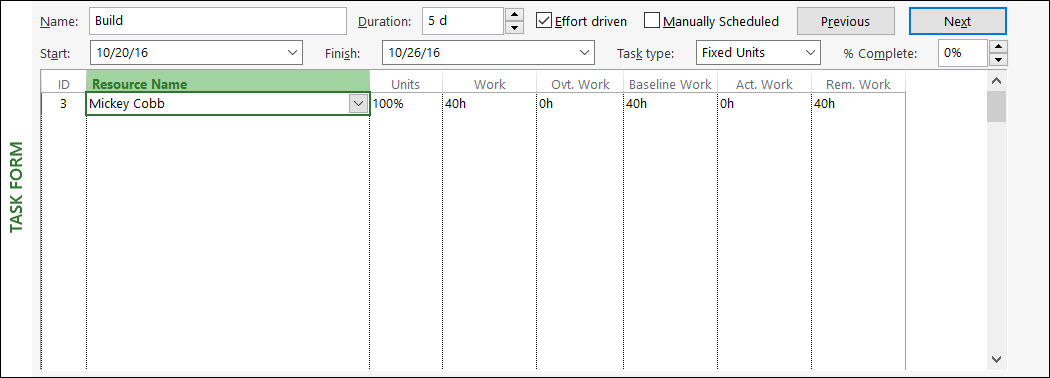 Figure 6: Work details applied in the Task Form pane
5. In the Task Form pane, enter the number of hours of planned overtime for the resource in the Rate column and then click the OK button.
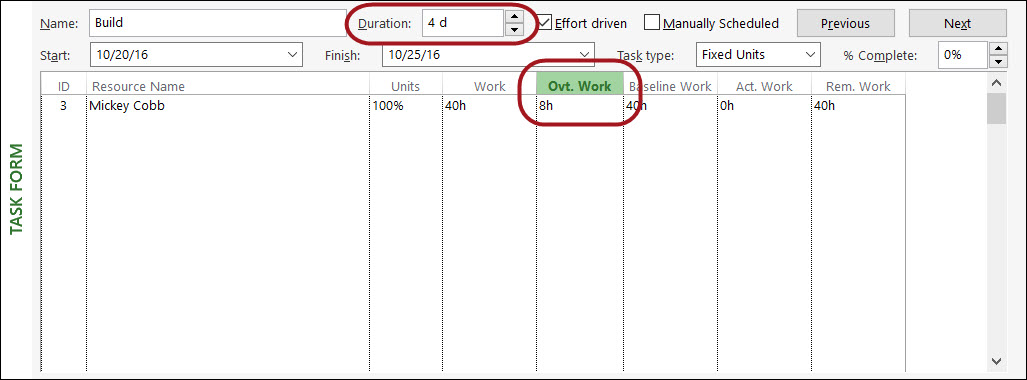 Figure 7: Assign overtime work for a resource
If your organization does not use the Microsoft PPM solution (Project Server or Project Online), then the final step is to manually enter actual overtime work for resources assigned with planned overtime work. To manually enter actual overtime work in your Microsoft Project schedule, complete the following steps:
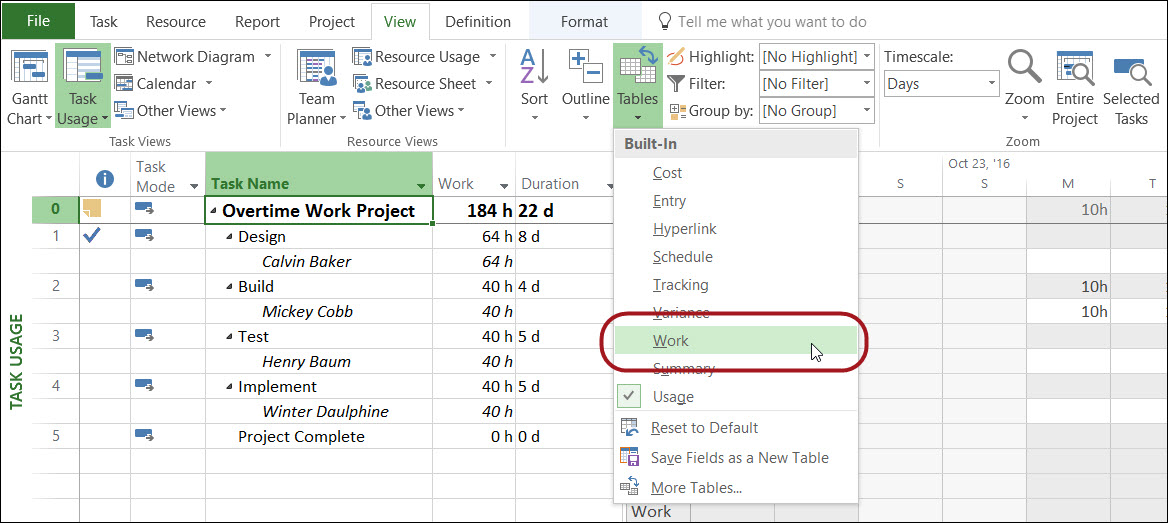 Figure 8: Select the Work table
4. Drag the split bar to the right edge of the % W. Complete
5. Right-click on the Remaining column header and select the Insert Column item on the shortcut menu, as shown in Figure 9.
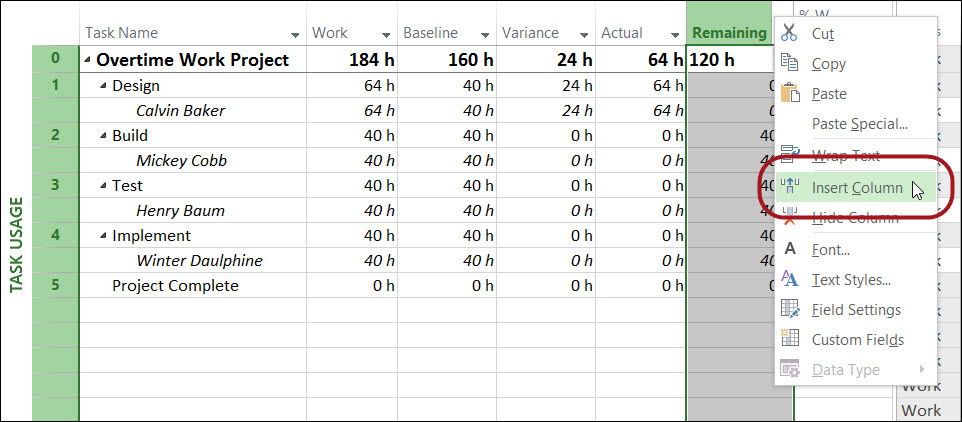 Figure 9: Insert a new column
6. In the list of available columns, select the Actual Overtime Work Figure 10 shows the Work table with the Actual Overtime Work column inserted to the right of the Actual column.
 Figure 10: Actual Overtime Work column inserted
7. In the Actual Overtime Work column, enter the total number of overtime work hours performed to date by the assigned team member.
8. In the Actual column, enter the total number of work hours performed to date by the assigned team member, including the overtime work.
For example, in Figure 11 notice that I manually entered “12 hours” in Actual Overtime Work column and “40 hours” in the Actual column for Mickey Cobb. This means that of the 40 hours of total actual work completed so far, 12 of the hours constitute actual overtime work.
 Figure 11: Enter actual work and actual overtime work
If your organization is using the Microsoft PPM solution (Project Server or Project Online), your team members will need to set up their Timesheet page in Project Web App (PWA) before they can enter actual overtime work. Team members should complete the following steps to correctly set up the Timesheet page in PWA:
 Figure 12: Select the checkboxes to track actual overtime work
Project Web App will refresh the timesheet grid to display the Actual and Overtime rows for every task assignment. To enter progress for regular work (non-overtime work) and overtime work, team members should use the following process:
For example, in Figure 13 notice that the team member entered 8 hours of regular work and 4 hours of overtime work on Monday and Tuesday for the first task in the project. Notice that the team member entered only regular work hours Wednesday through Friday for the second task. By completing overtime work on the first task, the team member will shorten the Duration of the first task from 3 days to 2 days.
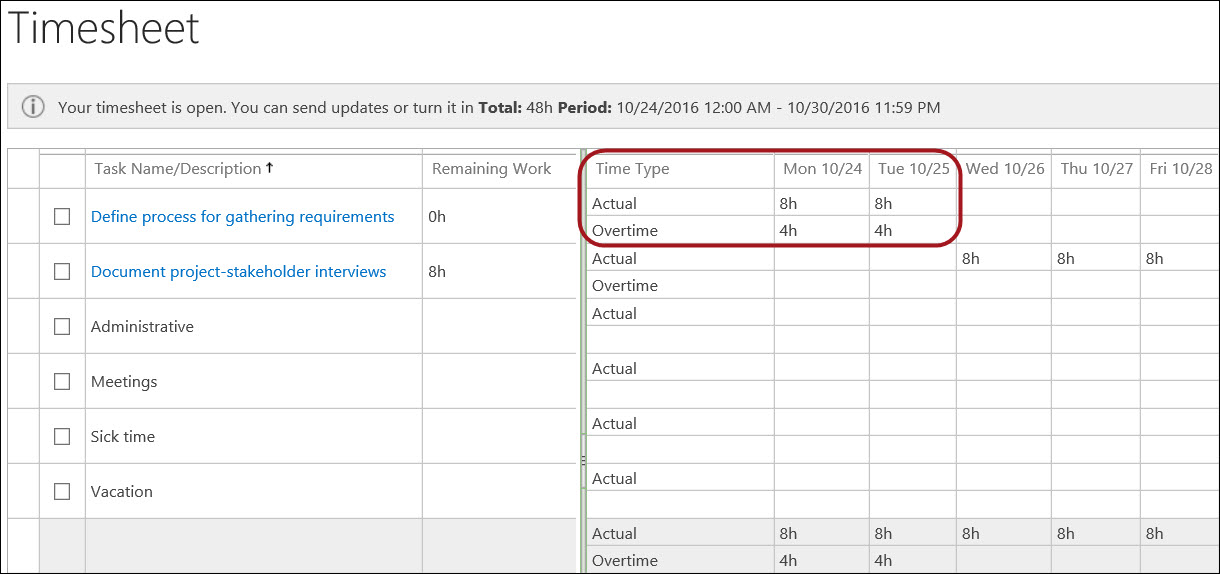 Figure 13: Actual and Overtime work entered

Sensei Project solutions is a recognized global leader in Microsoft project and portfolio management (PPM) solutions focused on improving the way your team works. Sensei’s unique turn-key PPM Platform in the Microsoft Cloud, Sensei IQ™, is designed around your needs and a modern way of working. Sensei IQ™ helps you make informed decisions by understanding how all work fits together with meaningful insights into projects, resources and programs across your portfolios.