When managing projects, there are situations in which a team member will be playing multiple roles throughout a project’s lifecycle. Let’s say that you are managing a project to implement and adopt Project Online in your company, and at a certain moment you will need an instructor to teach users how to use the software properly. Also, let’s say that you have organized the training phase to include classes based on the audience, so three requirements have been identified: one class for Team Members, one for Project Managers, and one for Administrators.
To correctly estimate the costs on your project, you need to make sure that the resource assigned to the tasks follows this criteria in terms of cost rate:
| Training (audience) | Cost Rate |
| Team Members | $ 45/hour |
| Project Managers | $ 70/hour |
| Administrators | $ 105/hour |
In a situation like this, Microsoft Project allows you to set up different cost rates for the resource, and then use the different values as needed when assigning the resource to tasks.
If you are using Microsoft Project standalone, open your project and navigate to the Resource Sheet view:

Figure 1: Resource Sheet view
After that, double-click the resource for whom you want to configure different cost rates. You will be presented with the Resource Information dialog:
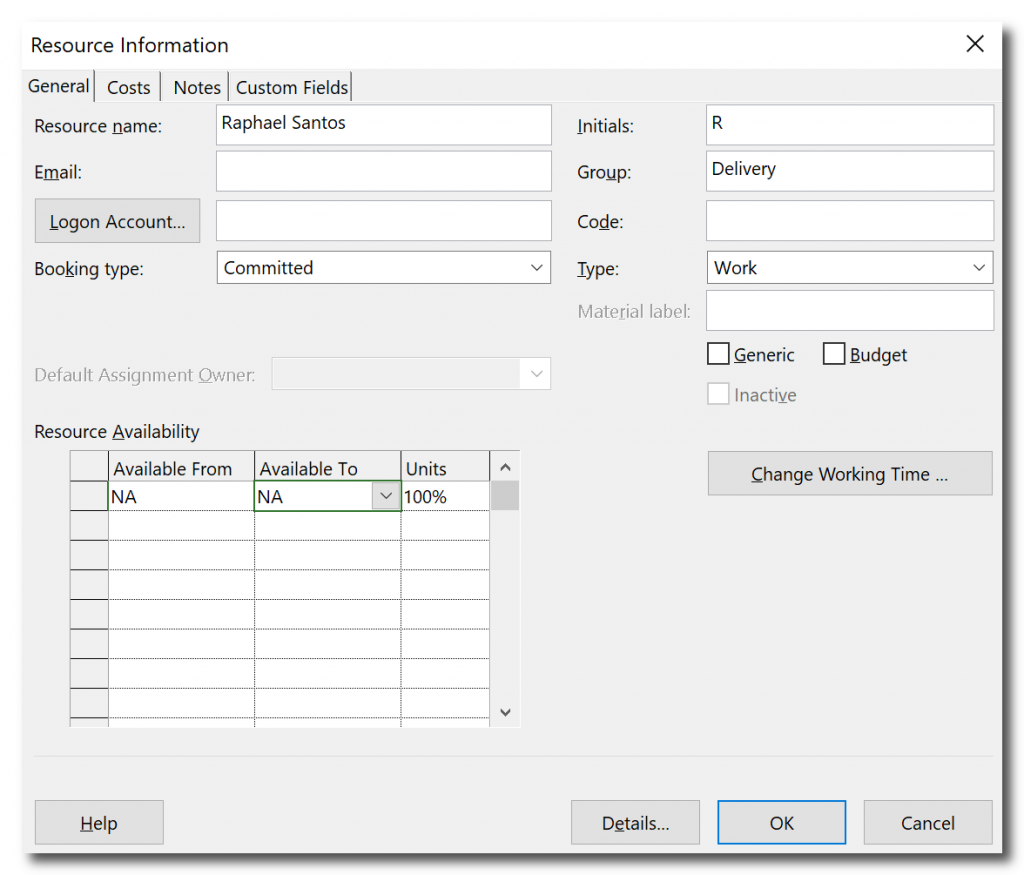
Figure 2: Resource Information dialog
In the Resource Information dialog, navigate to the Costs tab. There you will see that the Standard Rate for the resource is, in this example, $70/h, which is the cost rate used primarily when the resource is assigned to tasks. Note that this information is stored in the tab A (default), but you still have tabs B, C, D and E to store additional values.
Click on tab B. There add the value that represents the cost rate to be used when the resource is assigned to teach Team Members classes, $45/h:
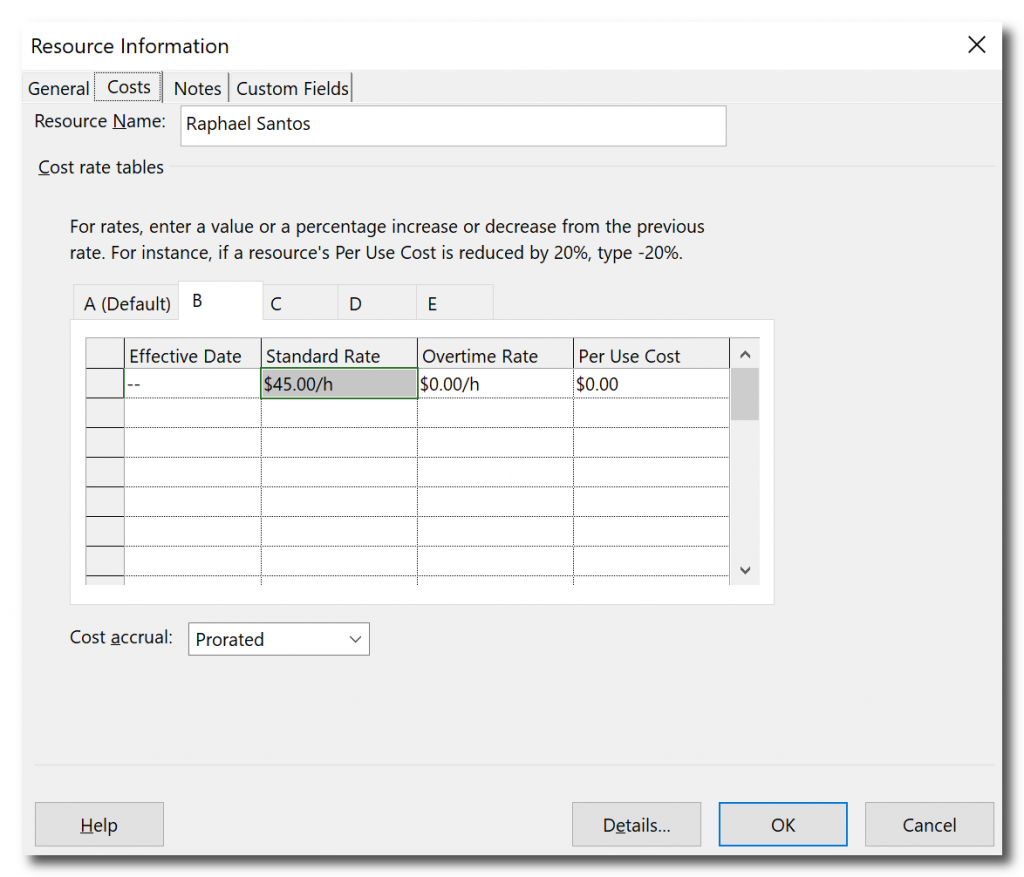
Figure 3: Resource Information Dialog (Costs tab – B)
Repeat the previous step on tab C, configuring it to represent the cost rate to be used when the resource is assigned to teach Administrators classes, $105/h:
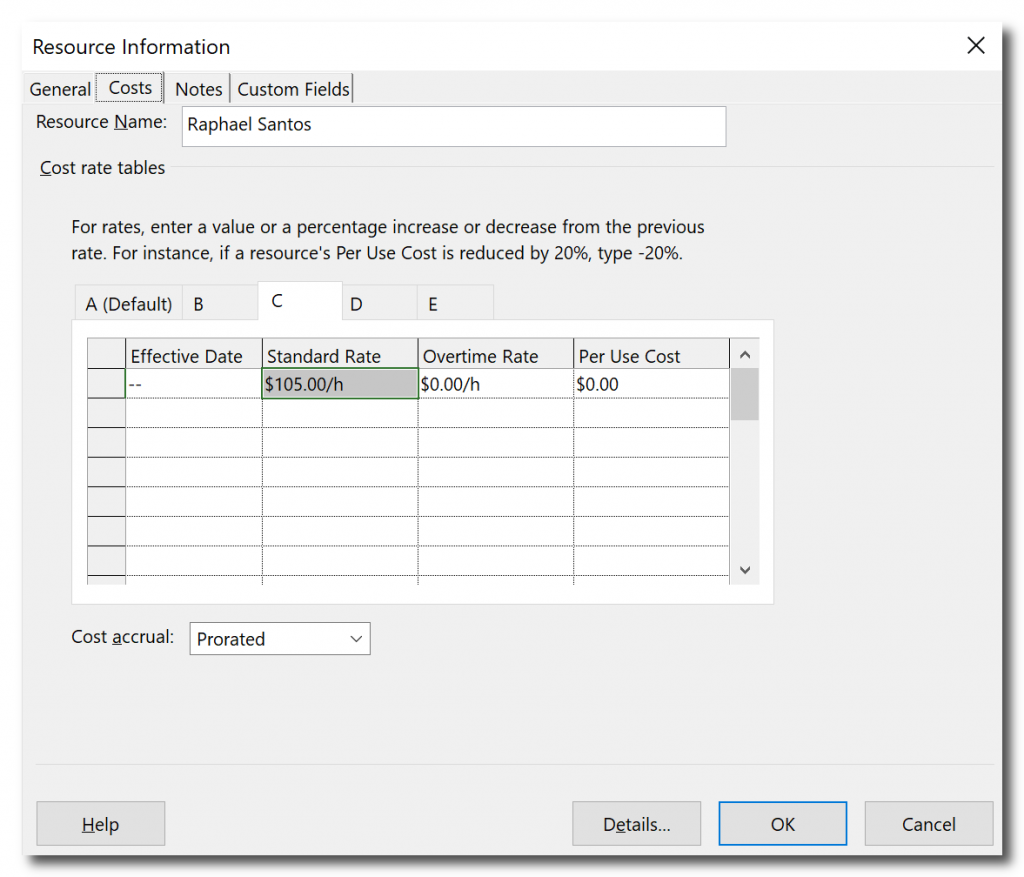
Figure 4: Resource Information dialog (Costs tab – C)
One additional step you can take is to navigate to the Notes tab and describe what is being taken into consideration for the three different cost rates that have been configured:
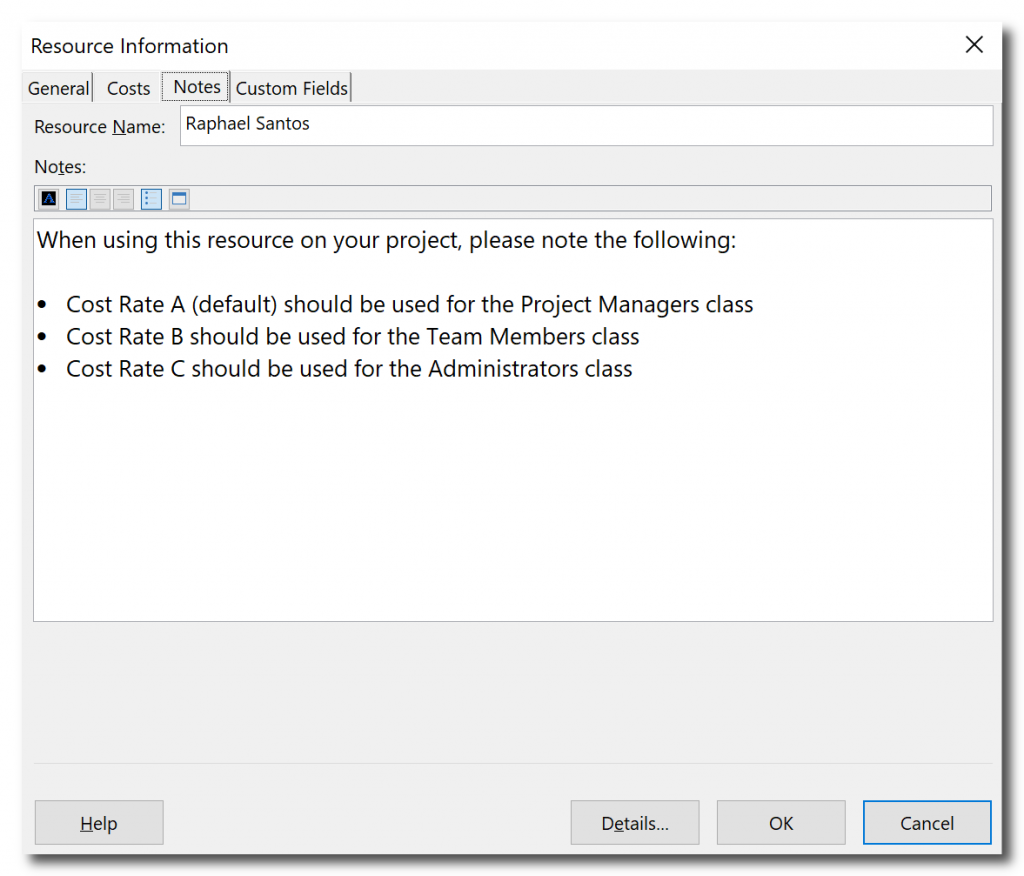
Figure 5: Resource Information dialog (Notes tab)
Important: If you are using Project Online or Project Server and want to configure additional cost rates for your resources, you will need to open the resource(s) in the ‘Checked-out Enterprise Resources’ mode. To achieve that, the first thing you need to do is to make sure you have the appropriate permissions in your environment (by default, Resource Managers, Portfolio Managers, and Administrators have permissions to edit a resource). After making sure you have the right permissions, you can follow the steps below:
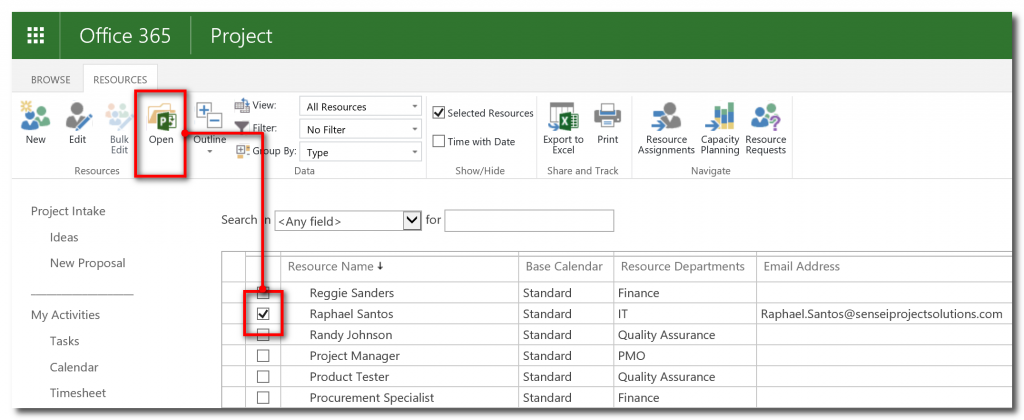
Figure 6: Opening the resources in edit mode in Project Online/Server
Once you have configured the cost rates for the resource(s), you can save and close the file.
Now that you have defined the different cost rates that will be associated with the resource, the next step is to determine when they will be used. Remember that when you assign a resource to a task, the default cost rate (tab A) is used to calculate the assignment cost:

Figure 7: Assignment costs
However, in this example, the only task that should use the standard rate is the ‘Conduct training for Project Managers’. The best way to change the other two tasks, so they are calculated using their appropriate cost rate, is to change the current view to the Resource Usage view, which will group the resources by the tasks they are assigned to:
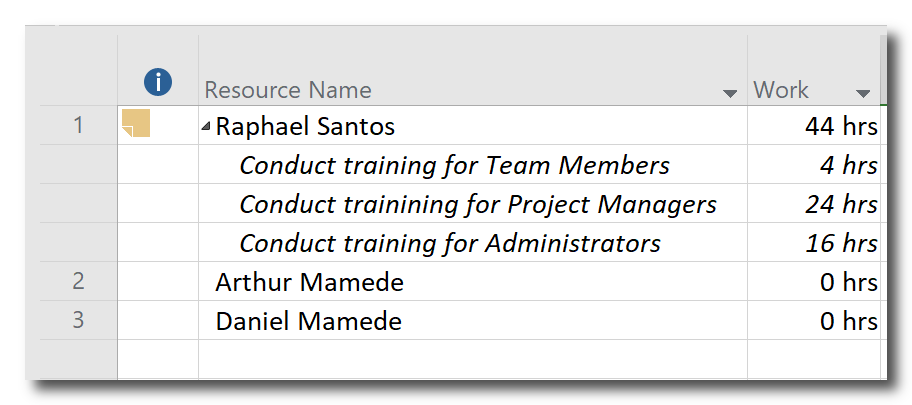
Figure 8: Resource Usage view
Once you are in the Resource Usage view, you can double-click the task that needs to be calculated with a different cost rate. This will open the Assignment Information dialog, which allows you to select the cost rate table to be applied:
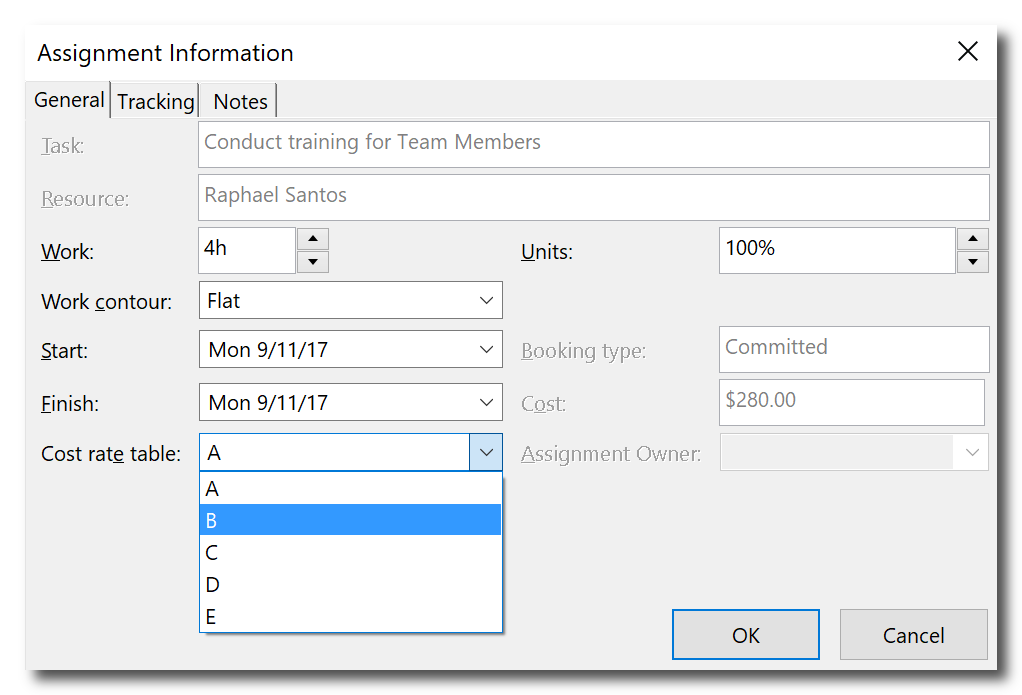
Figure 9: Assignment Information dialog
If you have multiple tasks for which different cost rates should be applied, right-clicking each one of them may be a time-consuming approach. To make the selection process easier, you can add the Cost Rate Table column to the Resource Usage view, so you can just select the appropriate cost rates from the column itself:
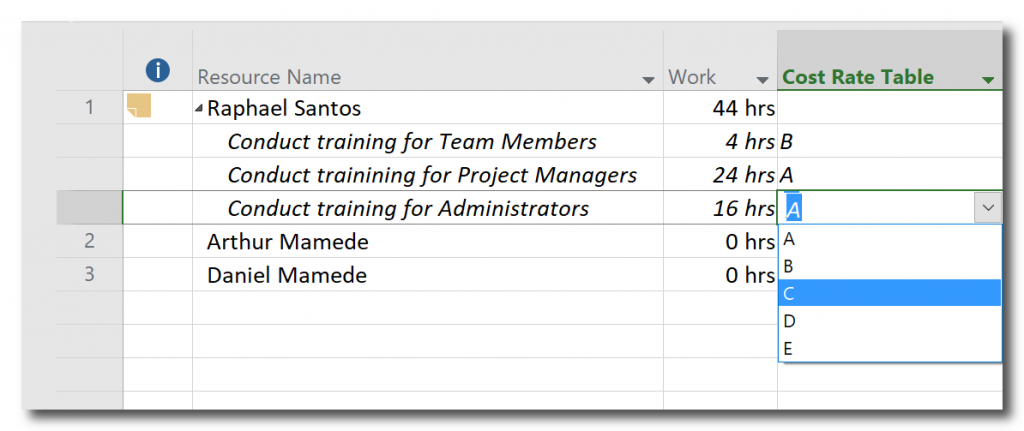
Figure 10: Using the Cost Rate Table column in the Resource Usage view
After defining the cost rates that will be used as a reference in each task, you can navigate back to the previous view and see that the costs have been updated:

Figure 11: New costs for the tasks

PMP, Microsoft Project MVP

Sensei Project solutions is a recognized global leader in Microsoft project and portfolio management (PPM) solutions focused on improving the way your team works. Sensei’s unique turn-key PPM Platform in the Microsoft Cloud, Sensei IQ™, is designed around your needs and a modern way of working. Sensei IQ™ helps you make informed decisions by understanding how all work fits together with meaningful insights into projects, resources and programs across your portfolios.